You have now succesfully completed making a temperature sensor with your raspberry pi.
If you wish to turn the raspberry pi off and restart it without connecting to a monitor, you must plug in a keyboard to the raspberry pi and plug the pi back into the socket. Then you wait 2 minutes before pressing Alt+F4 and the F5. This is assuming you have followed all of the previous steps.
Enjoy your temperature sensor.
Friday, 30 August 2013
Making a raspberry temperature sensor (step 8- lights and e-mail)
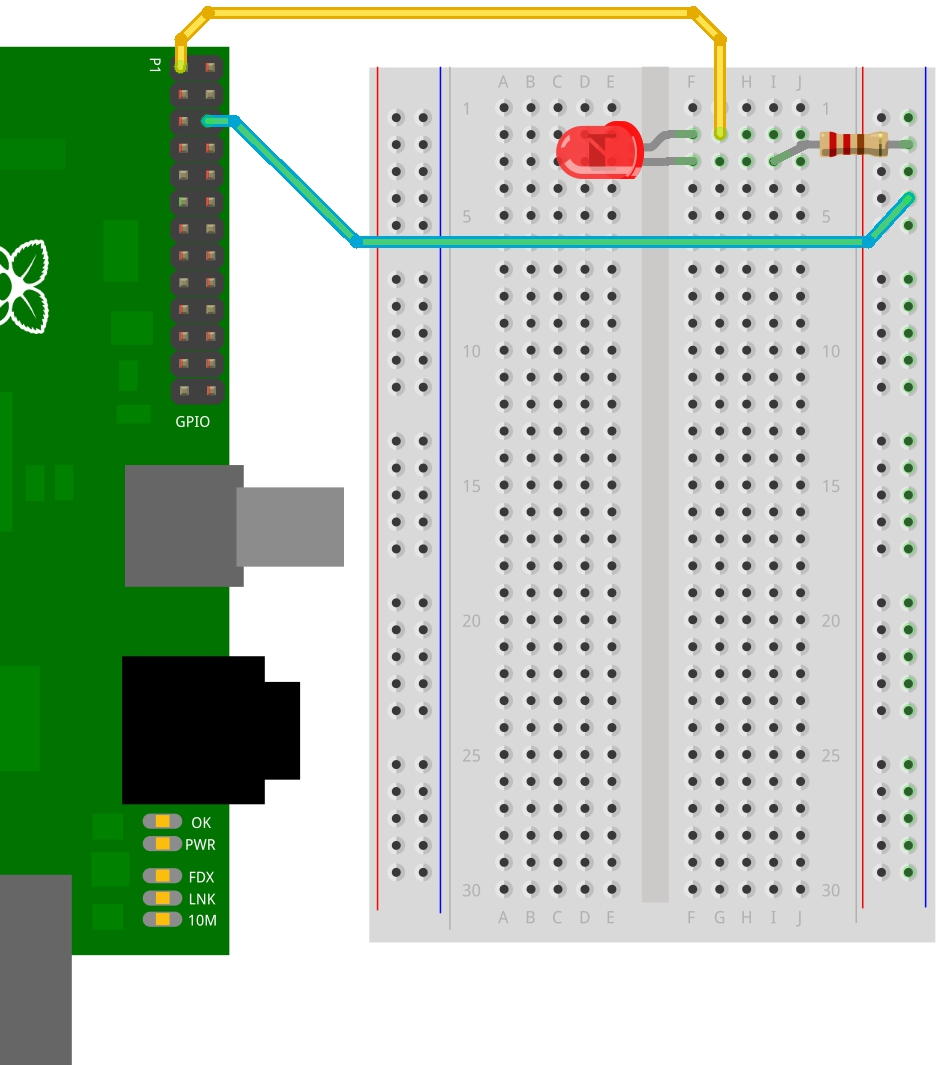
On sen.se make 2 more feeds. Set these up so that they e-mail you whenever data is recieved, this is quite easy on sen.se. Put led's into the gpio's 23, 24 and 25 preferably red, yellow and green (we are making a traffic light system). Then edit your code from the previous step and put in the new feed id's into feed_id 2 and 3.
import httplib
import json as simplejson
from random import randint
import time
import os
import glob
import wiringpi2 as wiringpi
wiringpi.wiringPiSetupGpio()
wiringpi.pinMode(23, 1) #red
wiringpi.pinMode(24, 1) #yellow
wiringpi.pinMode(25, 1) #green
wiringpi.digitalWrite(23, 0)
wiringpi.digitalWrite(24, 0)
wiringpi.digitalWrite(25, 0)
os.system('modprobe w1-gpio')
os.system('modprobe w1-therm')
base_dir = '/sys/bus/w1/devices/'
device_folder = glob.glob(base_dir + '28*')[0]
device_file = device_folder + '/w1_slave'
run_number = 0
SENSE_API_KEY =
FEED_ID1 = #actual graph
FEED_ID2 = #min
FEED_ID3 = #max
def read_temp_raw():
f = open(device_file, 'r')
lines = f.readlines()
f.close()
return lines
def read_temp():
lines = read_temp_raw()
while lines[0].strip()[-3:]!= 'YES':
time.sleep(1)
lines = read_temp_raw()
equals_pos = lines[1].find('t=')
if equals_pos != -1:
temp_string = lines[1][equals_pos+2:]
tempC = float(temp_string)/1000.0
return tempC
def send_to_opensense(data):
try:
datalist = [{"feed_id" :FEED_ID1, "value" :data['C']},]
headers = {"sense_key": SENSE_API_KEY,"content-type":"appliaction/json"}
conn = httplib.HTTPConnection("api.sen.se")
conn.request("POST", "/events/", simplejson.dumps(datalist),headers)
response = conn.getresponse()
conn.close()
except:
pass
ef send_to_opensense2(data): #do not edit please
try:
datalist = [{"feed_id" :FEED_ID2, "value" :data['C']},]
headers = {"sense_key": SENSE_API_KEY,"content-type":"appliaction/json"}
conn = httplib.HTTPConnection("api.sen.se")
conn.request("POST", "/events/", simplejson.dumps(datalist),headers)
response = conn.getresponse()
conn.close()
except:
pass
def send_to_opensense3(data):
try:
datalist = [{"feed_id" :FEED_ID3, "value" :data['C']},]
headers = {"sense_key": SENSE_API_KEY,"content-type":"appliaction/json"}
conn = httplib.HTTPConnection("api.sen.se")
conn.request("POST", "/events/", simplejson.dumps(datalist),headers)
response = conn.getresponse()
conn.close()
except:
pass
while(True):
try:
run_number = run_number + 1
tempC = read_temp()
print "RasPI(2) Ambient Run:",run_number," tempC:",tempC
data = {'C' : tempC}
send_to_opensense(data)
if 26.5 <= tempC and 29.5 >= tempC: # good range of 26.5-29.5 change for if range wants to change
wiringpi.digitalWrite(25, 1)
wiringpi.digitalWrite(24, 0)
wiringpi.digitalWrite(23, 0)
if 26 <= tempC and 26.5 > tempC: # okay range of 26 - 26.5 change if range wants to change
wiringpi.digitalWrite(25, 0)
wiringpi.digitalWrite(24, 1)
wiringpi.digitalWrite(23, 0)
if 26 > tempC: # bad range less than 26 change if range needs to change
wiringpi.digitalWrite(25, 0)
wiringpi.digitalWrite(24, 0)
wiringpi.digitalWrite(23, 1)
send_to_opensense2(data)
if 29.5 < tempC and 30 >= tempC: # okay range of 29.5 - 30 change if range wants to change
wiringpi.digitalWrite(25, 0)
wiringpi.digitalWrite(24, 1)
wiringpi.digitalWrite(23, 0)
if 30 < tempC: # bad range more than 30 change if range needs to change
wiringpi.digitalWrite(25, 0)
wiringpi.digitalWrite(24, 0)
wiringpi.digitalWrite(23, 1)
send_to_opensense3(data) #
time.sleep(10) #frequency of reading in seconds, change if required
# if ranges are changed, please make sure that ranges are continuous and do not edit the inequality signs
except:
pass
Getting the Pi to Auto-Start (Step 7)
To get the Pi to go straight to the desktop on start-up:
Encoding=UTF-8
Type=Application
Name="The name of your program"
Comment=
Exec=sudo python "The place where the program is saved for
instance /home/pi/mypython.py"
StartupNotify=false
Terminal=false
Hidden=false
- In the LX terminal type sudo raspi-config and a menu should appear where you can select to change the configuration for startup, so that when you start the pi it will skip the login step and the startx step and go straight to your desktop.
- In the /home/pi/.config directory create a folder called 'autostart'.
- In Leafpad create a file called 'mypythonprogram.desktop' and write the following code and save it to the directory /home/pi/desktop/ :
Encoding=UTF-8
Type=Application
Name="The name of your program"
Comment=
Exec=sudo python "The place where the program is saved for
instance /home/pi/mypython.py"
StartupNotify=false
Terminal=false
Hidden=false
- Then cut and paste the file into the autostart folder you created.
- Test it to see if it works by typing sudo reboot into the LX terminal.
Making a raspberry pi temperature sensor (step 6- coding the sensor)
Here is the sensor code. All you have to do is enter the API key and the feed ID. You will have to type this all out though it will not run if copied into python
import httplib
import json as simplejson
from random import randint
import time
import os
import glob
os.system('modprobe w1-gpio')
os.system('modprobe w1-therm')
base_dir = '/sys/bus/w1/devices/'
device_folder = glob.glob(base_dir + '28*')[0]
device_file = device_folder + '/w1_slave'
run_number = 0
SENSE_API_KEY = "your API key here" #note quotation marks
FEED_ID1 = your feed ID here #note no quotation marks
def read_temp_raw():
f = open(device_file, 'r')
lines = f.readlines()
f.close()
return lines
def read_temp():
lines = read_temp_raw()
while lines[0].strip()[-3:]!= 'YES':
time.sleep(1)
lines = read_temp_raw()
equals_pos = lines[1].find('t=')
if equals_pos != -1:
temp_string = lines[1][equals_pos+2:]
tempC = float(temp_string)/1000.0
return tempC
def send_to_opensense(data):
try:
datalist = [{"feed_id" :FEED_ID1, "value" :data['C']},]
headers = {"sense_key": SENSE_API_KEY,"content-type":"appliaction/json"}
conn = httplib.HTTPConnection("api.sen.se")
conn.request("POST", "/events/", simplejson.dumps(datalist),headers)
response = conn.getresponse()
conn.close()
except:
pass
while(True):
try:
run_number = run_number + 1
tempC = read_temp()
print "RasPI(2) Ambient Run:",run_number," tempC:",tempC
data = {'C' : tempC}
send_to_opensense(data)
time.sleep(10)
except:
pass
{code mostly from whiskeytangohotel}
Making a raspberrry pi temperature sensor (step 5- Set up the DS18b20)
This is probably one of the most difficult steps in the whole process.
This adafruit guide is probably the best tutorial for setting up the sensor.
http://learn.adafruit.com/adafruits-raspberry-pi-lesson-11-ds18b20-temperature-sensing/overview
The guide uses some parts that aren't necessary like the pi cobbler but life is easier if you have them.
Our ds18b20 came from amazon and had different wire colours to a normal ds18b20 sensor.
It came with red, white and a shielded wire these are:
red - VCC
white - Data
Shielded - Ground
Make sure the 3rd pin on the 5V side is used for ground, the 3.3V pin is used for power and the 4th pi on the 3.3V side is used for the data.
Making a raspberry pi temperature sensor (step 4- sen.se)
You need somewhere for the data your pi is going to collect to go. You can obviously just display it on a screen but so long as you have an internet connection it is easier to display it on the web.
Although there are lots of different places you could post your data to, sen.se is probably the best. It is specifically designed for arduino and raspberry pi users and so it's very handy. There are loads of different things you can do with displays and feeds and so you can set it up however you want.
All you have to do is go on the website and apply for an invitation the link is below:
http://open.sen.se/
Flashing lights
import wiringpi2 as wiringpi
from time import sleep
wiringpi.wiringPiSetupGpio()
wiringpi.pinMode(17, 1)
wiringpi.pinMode(27, 1)
wiringpi.pinMode(22, 1)
wiringpi.pinMode(24, 1)
wiringpi.pinMode(25, 1)
wiringpi.digitalWrite(17, 0) #yellow
wiringpi.digitalWrite(27, 0) #green
wiringpi.digitalWrite(22, 0) #bottum red
wiringpi.digitalWrite(24, 0) #mid red
wiringpi.digitalWrite(25, 0) #top red
sleep(3)
while 2 == 2:
wiringpi.digitalWrite(22, 1)
wiringpi.digitalWrite(24, 1)
wiringpi.digitalWrite(25, 1)
wiringpi.digitalWrite(17, 0)
wiringpi.digitalWrite(27, 1)
sleep(2)
wiringpi.digitalWrite(27, 0)
wiringpi.digitalWrite(17, 1)
sleep(2)
wiringpi.digitalWrite(22, 0)
wiringpi.digitalWrite(24, 0)
wiringpi.digitalWrite(25, 0)
wiringpi.digitalWrite(17, 0)
wiringpi.digitalWrite(27, 1)
sleep(2)
wiringpi.digitalWrite(27, 0)
wiringpi.digitalWrite(17, 1)
sleep(2)
core temp with lights and boundaries
import wiringpi2 as wiringpi
from time import sleep
import httplib
import json as simplejson
from random import randint
import time
wiringpi.wiringPiSetupGpio()
wiringpi.pinMode(17, 1)
wiringpi.pinMode(27, 1)
wiringpi.pinMode(22, 1)
wiringpi.digitalWrite(17, 0) #green
wiringpi.digitalWrite(27, 0) #yellow
wiringpi.digitalWrite(22, 0) #red
c = float(input("What is your ideal temperature?")) # 42
t = c
count = 0
reel = 4
while 2 == 2:
sleep(10)
t = int(open('/sys/class/thermal/thermal_zone0/temp').read())/1e3
if (c - 1.5) <= t <= (c + 1.5): #good region
count = 0
wiringpi.digitalWrite(17, 1)
wiringpi.digitalWrite(27, 0)
wiringpi.digitalWrite(22, 0)
elif (c - 2) < t < (c - 1.5): #a little too low
count = count + 1
wiringpi.digitalWrite(17, 0)
wiringpi.digitalWrite(27, 1)
wiringpi.digitalWrite(22, 0)
elif (c + 2) < t < (c + 1.5): #a little too high
count = count + 1
wiringpi.digitalWrite(17, 0)
wiringpi.digitalWrite(27, 1)
wiringpi.digitalWrite(22, 0)
elif t <= (c - 2): #dangerously low
count = count + 3
wiringpi.digitalWrite(17, 0)
wiringpi.digitalWrite(27, 0)
wiringpi.digitalWrite(22, 1)
elif t >= (c + 2): #dangerously high
count = count + 3
wiringpi.digitalWrite(17, 0)
wiringpi.digitalWrite(27, 0)
wiringpi.digitalWrite(22, 1)
Pi core temperature
import httplib
import json as simplejson
from random import randint
import time
run_number = 0
tempC = 0
SENSE_API_KEY =
FEED_ID1 =
def send_to_opensense(data):
try:
datalist = [{"feed_id" : FEED_ID1, "value" :data['C']},]
headers = {"sense_key": SENSE_API_KEY,"content-type":"application/json"}
conn = httplib.HTTPConnection("api.sen.se")
conn.request("POST","/events/",simplejson.dumps(datalist),headers)
response = conn.getresponse()
conn.close()
except:
pass
while(True):
try:
tempC = int(open('/sys/class/thermal/thermal_zone0/temp').read())/1e3
run_number = run_number + 1
print "Run:", run_number," tempC:", tempC
data = {'C' :tempC}
send_to_opensense(data)
time.sleep(60)
except:
pass
Crazy led script
import wiringpi2 as wiringpi
from time import sleep
wiringpi.wiringPiSetupGpio()
wiringpi.pinMode(17, 1)
wiringpi.pinMode(27, 1)
wiringpi.pinMode(22, 1)
wiringpi.pinMode(24, 1)
wiringpi.pinMode(25, 1)
wiringpi.digitalWrite(17, 0) #yellow
wiringpi.digitalWrite(27, 0) #green
wiringpi.digitalWrite(22, 0) #bottum red
wiringpi.digitalWrite(24, 0) #mid red
wiringpi.digitalWrite(25, 0) #top red
sleep(3)
while 2 == 2:
wiringpi.digitalWrite(22, 1)
wiringpi.digitalWrite(24, 1)
wiringpi.digitalWrite(25, 1)
wiringpi.digitalWrite(17, 0)
wiringpi.digitalWrite(27, 1)
sleep(0.02)
wiringpi.digitalWrite(27, 0)
wiringpi.digitalWrite(17, 1)
sleep(0.02)
wiringpi.digitalWrite(22, 0)
wiringpi.digitalWrite(24, 0)
wiringpi.digitalWrite(25, 0)
wiringpi.digitalWrite(17, 0)
wiringpi.digitalWrite(27, 1)
sleep(0.02)
wiringpi.digitalWrite(27, 0)
wiringpi.digitalWrite(17, 1)
sleep(0.02)
wiringpi.digitalWrite(22, 1)
wiringpi.digitalWrite(24, 1)
wiringpi.digitalWrite(25, 1)
wiringpi.digitalWrite(17, 0)
wiringpi.digitalWrite(27, 1)
sleep(0.04)
wiringpi.digitalWrite(27, 0)
wiringpi.digitalWrite(17, 1)
sleep(0.04)
wiringpi.digitalWrite(22, 0)
wiringpi.digitalWrite(24, 0)
wiringpi.digitalWrite(25, 0)
wiringpi.digitalWrite(17, 0)
wiringpi.digitalWrite(27, 1)
sleep(0.04)
wiringpi.digitalWrite(27, 0)
wiringpi.digitalWrite(17, 1)
sleep(0.04)
wiringpi.digitalWrite(22, 1)
wiringpi.digitalWrite(24, 1)
wiringpi.digitalWrite(25, 1)
wiringpi.digitalWrite(17, 0)
wiringpi.digitalWrite(27, 1)
sleep(0.06)
wiringpi.digitalWrite(27, 0)
wiringpi.digitalWrite(17, 1)
sleep(0.06)
wiringpi.digitalWrite(22, 0)
wiringpi.digitalWrite(24, 0)
wiringpi.digitalWrite(25, 0)
wiringpi.digitalWrite(17, 0)
wiringpi.digitalWrite(27, 1)
sleep(0.06)
wiringpi.digitalWrite(27, 0)
wiringpi.digitalWrite(17, 1)
sleep(0.06)
wiringpi.digitalWrite(22, 1)
wiringpi.digitalWrite(24, 1)
wiringpi.digitalWrite(25, 1)
wiringpi.digitalWrite(17, 0)
wiringpi.digitalWrite(27, 1)
sleep(0.08)
wiringpi.digitalWrite(27, 0)
wiringpi.digitalWrite(17, 1)
sleep(0.08)
wiringpi.digitalWrite(22, 0)
wiringpi.digitalWrite(24, 0)
wiringpi.digitalWrite(25, 0)
wiringpi.digitalWrite(17, 0)
wiringpi.digitalWrite(27, 1)
sleep(0.08)
wiringpi.digitalWrite(27, 0)
wiringpi.digitalWrite(17, 1)
sleep(0.08)
wiringpi.digitalWrite(22, 1)
wiringpi.digitalWrite(24, 1)
wiringpi.digitalWrite(25, 1)
wiringpi.digitalWrite(17, 0)
wiringpi.digitalWrite(27, 1)
sleep(0.01)
wiringpi.digitalWrite(27, 0)
wiringpi.digitalWrite(17, 1)
sleep(0.01)
wiringpi.digitalWrite(22, 0)
wiringpi.digitalWrite(24, 0)
wiringpi.digitalWrite(25, 0)
wiringpi.digitalWrite(17, 0)
wiringpi.digitalWrite(27, 1)
sleep(0.01)
wiringpi.digitalWrite(27, 0)
wiringpi.digitalWrite(17, 1)
sleep(0.01)
actual script
import httplib #do not edit please
import json as simplejson #do not edit please
from random import randint #do not edit please
import time #do not edit please
import os #do not edit please
import glob #do not edit please
import wiringpi2 as wiringpi #do not edit please
wiringpi.wiringPiSetupGpio() #do not edit please
wiringpi.pinMode(23, 1) #red
wiringpi.pinMode(24, 1) #yellow
wiringpi.pinMode(25, 1) #green
wiringpi.digitalWrite(23, 0)
wiringpi.digitalWrite(24, 0)
wiringpi.digitalWrite(25, 0)
os.system('modprobe w1-gpio') #do not edit please
os.system('modprobe w1-therm') #do not edit please
base_dir = '/sys/bus/w1/devices/' #do not edit please
device_folder = glob.glob(base_dir + '28*')[0] #do not edit please
device_file = device_folder + '/w1_slave' #do not edit please
run_number = 0
SENSE_API_KEY = #do not edit please
FEED_ID1 = #actual graph
FEED_ID2 = #min
FEED_ID3 = #max
def read_temp_raw(): #do not edit please
f = open(device_file, 'r') #do not edit please
lines = f.readlines() #do not edit please
f.close() #do not edit please
return lines #do not edit please
def read_temp(): #do not edit please
lines = read_temp_raw() #do not edit please
while lines[0].strip()[-3:]!= 'YES': #do not edit please
time.sleep(1) #do not edit please
lines = read_temp_raw() #do not edit please
equals_pos = lines[1].find('t=') #do not edit please
if equals_pos != -1: #do not edit please
temp_string = lines[1][equals_pos+2:] #do not edit please
tempC = float(temp_string)/1000.0 #do not edit please
return tempC #do not edit please
def send_to_opensense(data): #do not edit please
try:
datalist = [{"feed_id" :FEED_ID1, "value" :data['C']},]
headers = {"sense_key": SENSE_API_KEY,"content-type":"appliaction/json"}
conn = httplib.HTTPConnection("api.sen.se")
conn.request("POST", "/events/", simplejson.dumps(datalist),headers)
response = conn.getresponse()
conn.close()
except:
pass
def send_to_opensense2(data): #do not edit please
try:
datalist = [{"feed_id" :FEED_ID2, "value" :data['C']},]
headers = {"sense_key": SENSE_API_KEY,"content-type":"appliaction/json"}
conn = httplib.HTTPConnection("api.sen.se")
conn.request("POST", "/events/", simplejson.dumps(datalist),headers)
response = conn.getresponse()
conn.close()
except:
pass
def send_to_opensense3(data): #do not edit please
try:
datalist = [{"feed_id" :FEED_ID3, "value" :data['C']},]
headers = {"sense_key": SENSE_API_KEY,"content-type":"appliaction/json"}
conn = httplib.HTTPConnection("api.sen.se")
conn.request("POST", "/events/", simplejson.dumps(datalist),headers)
response = conn.getresponse()
conn.close()
except:
pass
while(True):
try:
run_number = run_number + 1
tempC = read_temp()
print "RasPI(2) Ambient Run:",run_number," tempC:",tempC
data = {'C' : tempC}
send_to_opensense(data)
if 26.5 <= tempC and 29.5 >= tempC: # good range of 26.5-29.5 change for if range wants to change
wiringpi.digitalWrite(25, 1) #do not edit please
wiringpi.digitalWrite(24, 0) #do not edit please
wiringpi.digitalWrite(23, 0) #do not edit please
if 26 <= tempC and 26.5 > tempC: # okay range of 26 - 26.5 change if range wants to change
wiringpi.digitalWrite(25, 0) #do not edit please
wiringpi.digitalWrite(24, 1) #do not edit please
wiringpi.digitalWrite(23, 0) #do not edit please
if 26 > tempC: # bad range less than 26 change if range needs to change
wiringpi.digitalWrite(25, 0) #do not edit please
wiringpi.digitalWrite(24, 0) #do not edit please
wiringpi.digitalWrite(23, 1) #do not edit please
send_to_opensense2(data) #do not edit please
if 29.5 < tempC and 30 >= tempC: # okay range of 29.5 - 30 change if range wants to change
wiringpi.digitalWrite(25, 0) #do not edit please
wiringpi.digitalWrite(24, 1) #do not edit please
wiringpi.digitalWrite(23, 0) #do not edit please
if 30 < tempC: # bad range more than 30 change if range needs to change
wiringpi.digitalWrite(25, 0) #do not edit please
wiringpi.digitalWrite(24, 0) #do not edit please
wiringpi.digitalWrite(23, 1) #do not edit please
send_to_opensense3(data) #do not edit please
time.sleep(10) #frequency of reading in seconds, change if required
# if ranges are changed, please make sure that ranges are continuous and do not edit the inequality signs
except:
pass
Making a raspberry pi temperature logger- (step 3- wiringPi)
Inevitably with your pi your going to need to use the GPIO's to control some kind of circuit.
To do this you are going to need a program called wiringPi, this lets you control the GPIO's through the LXterminal.
However, with this program you can not easily program the GPIO's through a runable script (you have to type the commands manually into the LXterminal every time you want to change a GPIO). As a result, you are probably going to want to download another program called wiringpi2-python. This lets you program the pi's GPIO's through a python script (although for it to work you must first sudo python from the LXterminal) and hence you can write a continuous script that contains commands to turn the GPIO's on and off.
This is the link with all the instructions of how to download wiringPi
https://projects.drogon.net/raspberry-pi/wiringpi/download-and-install/
Here is a link to all the instructions necessary to install and run wiringpi2 and on this page is linked some simple instructions of how to use it. (Although you can find our code below)
http://raspi.tv/how-to-install-wiringpi2-for-python-on-the-raspberry-pi
{code}
This code makes 5 led lights (when plugged in right) flash on and off prettily. You need any 5 led's the colour doesn't matter. Use GPIO's 17, 27, 22, 24 and 25 (there are plenty of pictures on the internet to help) and make sure all led's have a resistor in series and are grounded (ground gpio is third pin on the 5V side)
import wiringpi2 as wiringpi
from time import sleep
wiringpi.wiringPiSetupGpio()
wiringpi.pinMode(17, 1)
wiringpi.pinMode(27, 1)
wiringpi.pinMode(22, 1)
wiringpi.pinMode(24, 1)
wiringpi.pinMode(25, 1)
wiringpi.digitalWrite(17, 0) #yellow
wiringpi.digitalWrite(27, 0) #green
wiringpi.digitalWrite(22, 0) #bottum red
wiringpi.digitalWrite(24, 0) #mid red
wiringpi.digitalWrite(25, 0) #top red
sleep(3)
while 2 == 2:
wiringpi.digitalWrite(22, 1)
wiringpi.digitalWrite(24, 1)
wiringpi.digitalWrite(25, 1)
wiringpi.digitalWrite(17, 0)
wiringpi.digitalWrite(27, 1)
sleep(0.02)
wiringpi.digitalWrite(27, 0)
wiringpi.digitalWrite(17, 1)
sleep(0.02)
wiringpi.digitalWrite(22, 0)
wiringpi.digitalWrite(24, 0)
wiringpi.digitalWrite(25, 0)
wiringpi.digitalWrite(17, 0)
wiringpi.digitalWrite(27, 1)
sleep(0.02)
wiringpi.digitalWrite(27, 0)
wiringpi.digitalWrite(17, 1)
sleep(0.02)
wiringpi.digitalWrite(22, 1)
wiringpi.digitalWrite(24, 1)
wiringpi.digitalWrite(25, 1)
wiringpi.digitalWrite(17, 0)
wiringpi.digitalWrite(27, 1)
sleep(0.04)
wiringpi.digitalWrite(27, 0)
wiringpi.digitalWrite(17, 1)
sleep(0.04)
wiringpi.digitalWrite(22, 0)
wiringpi.digitalWrite(24, 0)
wiringpi.digitalWrite(25, 0)
wiringpi.digitalWrite(17, 0)
wiringpi.digitalWrite(27, 1)
sleep(0.04)
wiringpi.digitalWrite(27, 0)
wiringpi.digitalWrite(17, 1)
sleep(0.04)
wiringpi.digitalWrite(22, 1)
wiringpi.digitalWrite(24, 1)
wiringpi.digitalWrite(25, 1)
wiringpi.digitalWrite(17, 0)
wiringpi.digitalWrite(27, 1)
sleep(0.06)
wiringpi.digitalWrite(27, 0)
wiringpi.digitalWrite(17, 1)
sleep(0.06)
wiringpi.digitalWrite(22, 0)
wiringpi.digitalWrite(24, 0)
wiringpi.digitalWrite(25, 0)
wiringpi.digitalWrite(17, 0)
wiringpi.digitalWrite(27, 1)
sleep(0.06)
wiringpi.digitalWrite(27, 0)
wiringpi.digitalWrite(17, 1)
sleep(0.06)
wiringpi.digitalWrite(22, 1)
wiringpi.digitalWrite(24, 1)
wiringpi.digitalWrite(25, 1)
wiringpi.digitalWrite(17, 0)
wiringpi.digitalWrite(27, 1)
sleep(0.08)
wiringpi.digitalWrite(27, 0)
wiringpi.digitalWrite(17, 1)
sleep(0.08)
wiringpi.digitalWrite(22, 0)
wiringpi.digitalWrite(24, 0)
wiringpi.digitalWrite(25, 0)
wiringpi.digitalWrite(17, 0)
wiringpi.digitalWrite(27, 1)
sleep(0.08)
wiringpi.digitalWrite(27, 0)
wiringpi.digitalWrite(17, 1)
sleep(0.08)
wiringpi.digitalWrite(22, 1)
wiringpi.digitalWrite(24, 1)
wiringpi.digitalWrite(25, 1)
wiringpi.digitalWrite(17, 0)
wiringpi.digitalWrite(27, 1)
sleep(0.01)
wiringpi.digitalWrite(27, 0)
wiringpi.digitalWrite(17, 1)
sleep(0.01)
wiringpi.digitalWrite(22, 0)
wiringpi.digitalWrite(24, 0)
wiringpi.digitalWrite(25, 0)
wiringpi.digitalWrite(17, 0)
wiringpi.digitalWrite(27, 1)
sleep(0.01)
wiringpi.digitalWrite(27, 0)
wiringpi.digitalWrite(17, 1)
sleep(0.01)
Making a raspberry pi data logger (step 2- updating the pi)
This step is really easy.
Open the lx terminal, type the following commands
sudo apt-get update
sudo apt-get upgrade
This will make sure your pi is running up to date. (Note these commands take some time to complete)
Open the lx terminal, type the following commands
sudo apt-get update
sudo apt-get upgrade
This will make sure your pi is running up to date. (Note these commands take some time to complete)
How to make a raspberry pi temperature logger (step 1- setup the pi)
First you need a raspberry pi, prefereably with the starter kit including a SD card with raspian preloaded. All you need to do is to plug in a mouse and keyboard to the pi, connect wi pi (we had trouble with this and you'll need a usb hub) or insert an ethanet cable (this is so much easier) connect the pi to a screen (you'll need to buy a cable for this) and then plug the pi in to the mains.
You'll be confronted with a user name and password, these are given to you, the standard one is pi and raspberry respectively. Once these are entered you must enter the command startx.
You are now on the operating system of the pi.
You'll be confronted with a user name and password, these are given to you, the standard one is pi and raspberry respectively. Once these are entered you must enter the command startx.
You are now on the operating system of the pi.
Thursday, 29 August 2013
Temperature Sensor Project Complete
Today, we installed the raspberry pi temp measuring system in the aquarium of the life sciences department. We encountered several problems today, such as enabling the wiPi to make the pi wireless. However today was an overiding success. We made the pi log straight on to the desktop and open the program up. We edited the code that now displays visually (using LEDs) whether the temperature of the tank has fallen out of the acceptable range and also worked in an email notification for this aswell.
Tomorrow we will post a step by step guide with the codes we used.
Tomorrow we will post a step by step guide with the codes we used.
Tuesday, 27 August 2013
How to post core temperature from a raspberry pi to a senseboard using python
Stuff you need:
A sen.se account (just apply for one)
A raspberry pi (with python installed)
Internet connection
This code literally reads the pi's core temperature, every minute, and then displays it, in python, and then sends it to a sen.se account on the internet which can be viewed from anywhere.
Sen.se is designed for people to store information obtained using arduino or raspberry pi boards.
import httplib
import json as simplejson
from random import randint
import time
run_number = 0
tempC = 0
SENSE_API_KEY = "your api key here(note it is in quotes)"
FEED_ID1 = your feed key here #note it is not in quotes
def send_to_opensense(data):
try:
datalist = [{"feed_id" : FEED_ID1, "value" :data['C']},]
headers = {"sense_key": SENSE_API_KEY,"content-type":"application/json"}
conn = httplib.HTTPConnection("api.sen.se")
conn.request("POST","/events/",simplejson.dumps(datalist),headers)
response = conn.getresponse()
conn.close()
except:
pass
while(True):
try:
tempC = int(open('/sys/class/thermal/thermal_zone0/temp').read())/1e3
run_number = run_number + 1
print "Run:", run_number," tempC:", tempC
data = {'C' :tempC}
send_to_opensense(data)
time.sleep(60)
except:
pass
Friday, 23 August 2013
Making sen.se of it All
Today we managed to get the Pi connected to the internet and we got the Pi sending data to our senseboard on open.sen.se, at the moment it is only displaying the core temperature of the Pi and relevent figures, but soon we will get the Pi sending data of other temperatures.
http://open.sen.se/raspberrypimonitoringfish
http://open.sen.se/raspberrypimonitoringfish
Thursday, 22 August 2013

We found avrdude...sort of
Yesterday we had the problem warning about avrdude and thought that the file had been moved. However, we found it was actually a problem the settings and is easily fixed by simply selcting tools and serial port and changing the serial port.
Wednesday, 21 August 2013
Where is avrdude?
Our issue is that the file avrdude, which is important for communication between the raspberry pi and the arduino, has been moved. After browsing the internet we have found this is a fairly common problem. We will inform you if we find a solution.
Sen.se
A board on a webpage that can display any of the data that we collect is currently under production on the sen.se website.
http://open.sen.se/sensemeters/tab/5196/
http://open.sen.se/sensemeters/tab/5196/
Tuesday, 20 August 2013

Monday, 19 August 2013
Are things beginning to feel hot in here? Shall we check?
Today we started by working out an overall plan of what we needed to do to get the thermometer working we need to:
1) connect the thermometer to the arduino
2) connect the arduino to the raspberry pi
3) connect the raspberry pi to the internet
Of course, there is a lot more to it than 3 lines but we have made huge progress today.
Firstly, we have succesfully connected the arduino to the raspberry pi by following the instructions on this link http://baldwisdom.com/simplified-setup-for-arduino-on-raspberry-pi/ . Then we succesfully connected the thermometer to the arduino using a simpilfied version of the circuit on the following link http://openenergymonitor.org/emon/buildingblocks/rtd-temperature-sensing / . Finally, we used the code on this website to read a sensor (to be linked later) giving us a resistance. Also, in previous days, as mentioned, we started towards the goal of making the raspberry pi a web server which suggests we are close to completion.
The final steps to be completed over the coming days include:
1) calibrate the sensor so we can get a temperature
2) finish the connection between raspberry pi and internet.
Friday, 16 August 2013
Let there be light
Yesterday, we succesfully managed to turn an LED light off and on using python. Today, using similar software, we shall try to get a traffic light system working. Though it may seem irrelevant, it is important practice before we attempt the far more complex thermometer. It allows us to familiarise ourselves with the GPIO board and using the pi in python. We will keep you updated.
Thursday, 15 August 2013
Wednesday, 14 August 2013
The day of dead ends
Today we aimed to try to:
- use python to control and LED light(for practice)
- try to connect the thermometer to the arduino
- set up the raspberry pi as a web server
We used some of the methods posted on previous blogs but where unable to get them to work succesfully. Alot of the time it was due to the sites using outdated raspberry pi software. However, some good things that has come out of today is we have the camera on the raspberry pi set up and have a better idea about resistors (to have completed post soon).
Tuesday, 13 August 2013
Raspberry pi
http://www.myraspberry-pi.org/wp-content/uploads/2013/02/Raspberry.Pi_.User_.Guide_.pdf
on page 88 there is a method to connect your pi to the internet
on page 88 there is a method to connect your pi to the internet
Monday, 12 August 2013
Friday, 9 August 2013
Wednesday, 7 August 2013
Python
We spent the day looking at what we would need to get the Pi up and running and what we would need to use to measure temperature and looking for a waterproof case for the Pi (we found you can't buy one as they are still in development) before watching and reading tutorials for coding with Python which will be important when using the Pi.
Tuesday, 6 August 2013
Stuff We Might Need
Temperature Sensor
- Waterproof DS18b20 (or alternative)
- Half-sized breadboard
- Jumper wire pack
- Pi cobbler
- 4.7k resistor
- http://onecall.farnell.com/labfacility/drg-010632a/pt100-temperature-sensor-6x50mm/dp/SN35944
- Atlas scientific pH kit
- VGA - HDMI converter
- HDMI cable
- Etheret Cable
- http://uk.farnell.com/raspberry-pi-accessories#hdmicable
- http://uk.farnell.com/pro-signal/psg02574/lead-hdmi-to-dvi-2m/dp/1813133
The Camera Board and the Raspberry Pi
You can only use one camera board per Pi, however there are two possible solutions for using two cameras:
- Simply use 2 Pi's and 2 camera boards and connect them through the network.
- Or you can connect the camera board and also a USB camera but this is likely to slow down the Pi considerably.
Zebrafish
The Zebrafish - The Zebrafish is a tropical freshwater fish native to the himayalan area. They are often used in experiments as they have several unique properties, for example they are regenerative and their embryos are transparent. All zebra fish have 5 uniform, pigmented, horizontal, blue strips along the side of the body all the way to the caudal fin, perhaps using this information we can more easily identify the fish on a computer. We must do more research on the spots of a zebrafish and how and why they change.


Monday, 5 August 2013
Tracking Fish With Cameras
Day 1 - Part 2
Tracking fish with cameras - Tracking the movement of objects has been done before and the cameras can stream live videos to an interface. Some of the problems we may encounter include being able to identify fish from other objects and each other and also, being able to track fish without using tags. Already existing algorithms in this area are extremely complicated.
Tomorrow, we must learn how to define a happy fish.
The Aim
The aim of our project is to produce a method of measuring how happy fish are. We are doing it with a budget of £50 on behalf of the University of Liverpool's department of vetinary science. The fish who's happiness is in question is the zebrafish.
The Raspberry Pi

Subscribe to:
Comments (Atom)